Interactive Furni Labels
This tutorial will teach you how you can create a wired label system which will allow players to find out what your furni does, or where your teleporter goes, when they click it!
1x WIRED Selector: Furni with Variable
1x WIRED Effect: Show Message
1x WIRED Text Add-on: Variable Placeholder
1x WIRED Add-on: Execution Limit
1x WIRED Variable: Furni Variable
1x WIRED Variable Add-on: Text Connector
1. WIRED Trigger: User Clicks Furni
2. WIRED Selector: Furni with Variable
3. WIRED Effect: Show Message
4. WIRED Text Add-on: Variable Placeholder
5. WIRED Add-on: Execution Limit
You will also need to have the following Variable Stack in your room. This does not need to be on your wired stack, however, keeping it there helps with organisation when you add future wired!
1. WIRED Variable: Furni Variable
2. WIRED Variable Add-on: Text Connector
Note: The Text Connector must be placed on top of your Furni Variable.

Under Advanced Options, Select "Use furni from Selector".
This will ensure the stack works as soon as you add a label to a piece of furni, you will not need to edit the Trigger each time you add a new label.
Configure your variable with the following settings:
• Variable name: label
• Variable Options: Has value
• Availability Options: Permanent
Under Choose Variable, select: "label"
Click "Ready" to save your settings.
Under Message, type: This teleport goes to $(label)
Set your Notification Style to "Info".
The $(label) placeholder is what will change in the text to identify what furni you are clicking. You may change the message to suit your needs, for example, if you are making a shop, you could change the text to "This item is $(label)" and use the label variable to set your price!
Configure the following settings:
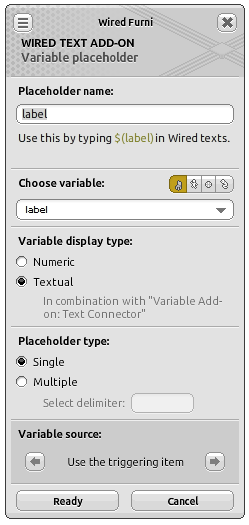
• Placeholder name: label
• Choose Variable (Furni): label
• Variable display type: Textual
Your placeholder name must match the placeholder used in your WIRED Effect.
Note: The Textual display type cannot be selected until the WIRED Variable Add-on: Text Connector has been placed on top of the WIRED Variable: Furni Variable.
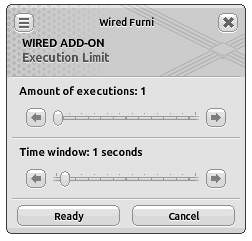
Configure the following settings:
• Amount of executions: 1
• Time window: 1 second
This prevents the message from being spammed when a user double clicks the teleporter.
Once again, click "ready" to save your settings.
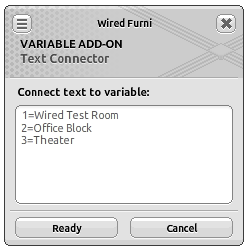
Under "Connect text to variable:', enter a label for each selected piece of furni. For example:
1=Wired Test Room
2=Office Block
3=Theatre
The number will be what you set the "label" variable to on each of your furni as explained later, the text is what you want to replace $(label) with in your message.
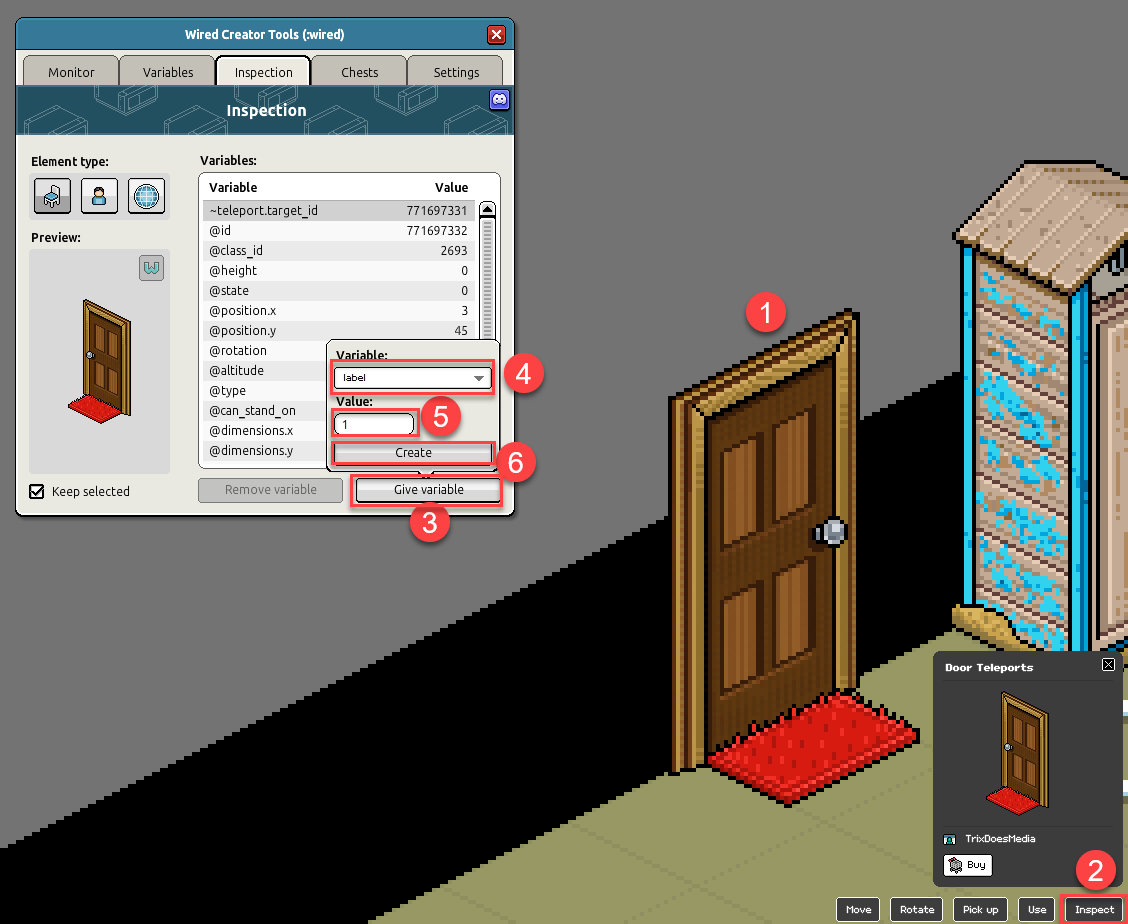
To do this:
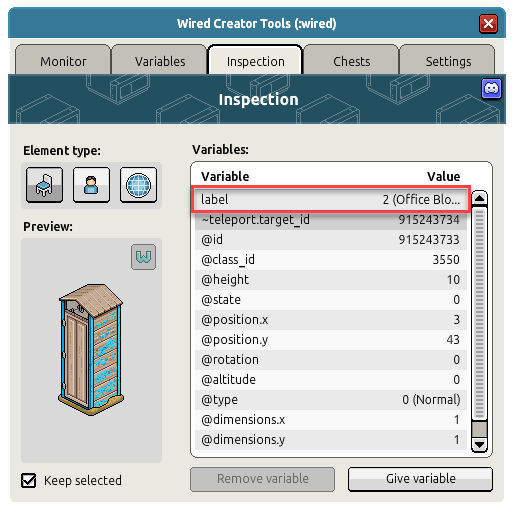
1. Click the furni you wish to label
2. Click "Inspect."
3. Click "Give variable"
4. Find the "label" variable you created earlier in the list.
5. Update the value to the value you set in your Text Connector. In this example, I am setting my teleporter to 1, so when it's clicked it will show "This teleport goes to Wired Test Room"
6. Click "Create"
7. Repeat these steps for every furni you wish to label.
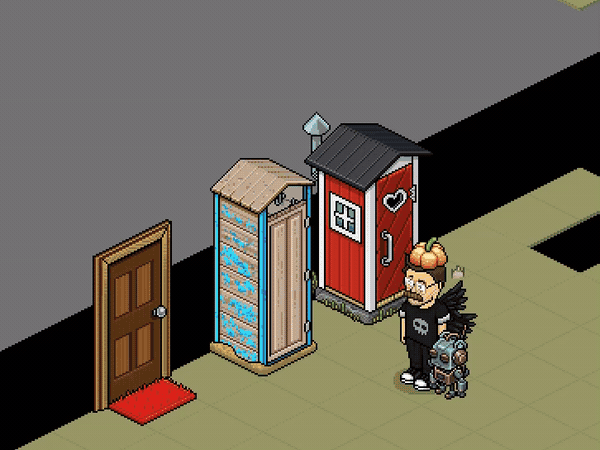
Did you know? You can preview your text after you've added the variable to your furni? See below!
This system isn't limited to teleporters either. Setting up a shop? The same principles apply!
What You Will Need
Wired
1x WIRED Trigger: User Clicks Furni1x WIRED Selector: Furni with Variable
1x WIRED Effect: Show Message
1x WIRED Text Add-on: Variable Placeholder
1x WIRED Add-on: Execution Limit
1x WIRED Variable: Furni Variable
1x WIRED Variable Add-on: Text Connector
Step 1
Set Up Your Wired Stack
Create your Wired stack in the following order:Set Up Your Wired Stack
1. WIRED Trigger: User Clicks Furni
2. WIRED Selector: Furni with Variable
3. WIRED Effect: Show Message
4. WIRED Text Add-on: Variable Placeholder
5. WIRED Add-on: Execution Limit
You will also need to have the following Variable Stack in your room. This does not need to be on your wired stack, however, keeping it there helps with organisation when you add future wired!
1. WIRED Variable: Furni Variable
2. WIRED Variable Add-on: Text Connector
Note: The Text Connector must be placed on top of your Furni Variable.
Step 2
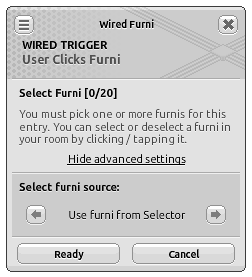
Set Up Trigger
Open your WIRED Trigger: User Clicks Furni.Set Up Trigger
Under Advanced Options, Select "Use furni from Selector".
This will ensure the stack works as soon as you add a label to a piece of furni, you will not need to edit the Trigger each time you add a new label.
Step 3
Set Up Your Variable
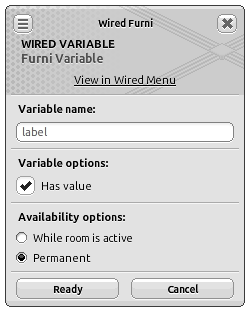
Open your WIRED Variable: Furni Variable.Set Up Your Variable
Configure your variable with the following settings:
• Variable name: label
• Variable Options: Has value
• Availability Options: Permanent
Step 4
Set Up Your Selector
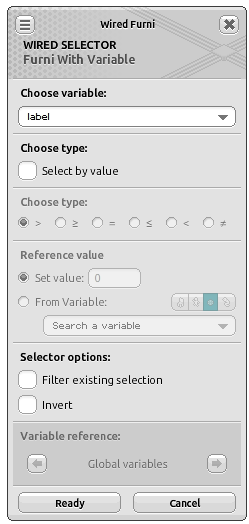
Open your WIRED Selector: Furni with Variable.Set Up Your Selector
Under Choose Variable, select: "label"
Click "Ready" to save your settings.
Step 5
Set Up Your Effect
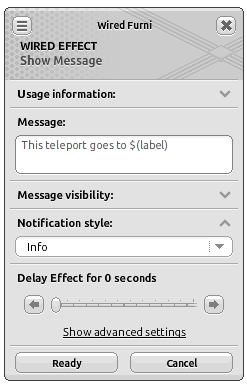
Open your WIRED Effect: Show Message.Set Up Your Effect
Under Message, type: This teleport goes to $(label)
Set your Notification Style to "Info".
The $(label) placeholder is what will change in the text to identify what furni you are clicking. You may change the message to suit your needs, for example, if you are making a shop, you could change the text to "This item is $(label)" and use the label variable to set your price!
Step 6
Set Up Your Variable Placeholder
Open your WIRED Text Add-on: Variable Placeholder.Set Up Your Variable Placeholder
Configure the following settings:
• Placeholder name: label
• Choose Variable (Furni): label
• Variable display type: Textual
Your placeholder name must match the placeholder used in your WIRED Effect.
Note: The Textual display type cannot be selected until the WIRED Variable Add-on: Text Connector has been placed on top of the WIRED Variable: Furni Variable.
Step 7
Set Up Your Execution Limit
Open your WIRED Add-on: Execution Limit.Set Up Your Execution Limit
Configure the following settings:
• Amount of executions: 1
• Time window: 1 second
This prevents the message from being spammed when a user double clicks the teleporter.
Once again, click "ready" to save your settings.
Step 8
Set Up Your Text Connector
Open your WIRED Variable Add-on: Text ConnectorSet Up Your Text Connector
Under "Connect text to variable:', enter a label for each selected piece of furni. For example:
1=Wired Test Room
2=Office Block
3=Theatre
The number will be what you set the "label" variable to on each of your furni as explained later, the text is what you want to replace $(label) with in your message.
Step 9
Set Up Your Furni Variables
Finally, you must give each furni/teleporter it's own, unique, label variable.Set Up Your Furni Variables
To do this:
1. Click the furni you wish to label
2. Click "Inspect."
3. Click "Give variable"
4. Find the "label" variable you created earlier in the list.
5. Update the value to the value you set in your Text Connector. In this example, I am setting my teleporter to 1, so when it's clicked it will show "This teleport goes to Wired Test Room"
6. Click "Create"
7. Repeat these steps for every furni you wish to label.
Did you know? You can preview your text after you've added the variable to your furni? See below!
Final Result!
You now have several labelled furni that display a unique message when clicked!This system isn't limited to teleporters either. Setting up a shop? The same principles apply!